
To add a shared mailbox in Outlook, open your Outlook application, go to File, and select Account Settings. Click on “Change” and then “More Settings,” where you can add the shared mailbox under the “Advanced” tab.
Shared mailboxes in Outlook allow multiple users to access a common inbox, making team collaboration easier. Adding a shared mailbox can streamline communication and improve workflow. It provides a centralized location for emails, calendar events, and tasks. This feature is especially useful for teams working on projects or for departments that handle customer inquiries.
Setting up a shared mailbox is a straightforward process. Understanding how to manage it effectively can enhance your team’s productivity and ensure seamless communication among members.
A Shared Mailbox in Outlook
What Is A Shared Mailbox?
Adding a shared mailbox in Outlook can enhance teamwork. But first, what exactly is a shared mailbox? A shared mailbox allows multiple users to access and manage emails from one central inbox. This feature is perfect for teams that need to collaborate effectively. It enables users to send and receive emails, manage calendars, and share contacts seamlessly. This setup makes it easier to stay organized and connected.
Purpose Of Shared Mailboxes
The primary purpose of shared mailboxes is to improve communication within teams. They provide a common space for email management. This setup helps reduce confusion and enhances collaboration. Here are some specific purposes of shared mailboxes:
- Centralized Communication: All team members can access the same inbox.
- Team Collaboration: Multiple users can respond to emails together.
- Task Management: Shared calendars help manage team schedules.
- Customer Support: Teams can handle support requests efficiently.
Using a shared mailbox helps in task distribution. Team members can see which emails have been addressed. This avoids duplicate responses. Here’s a simple table to summarize the purposes:
| Purpose | Description |
|---|---|
| Centralized Communication | One inbox for all team members. |
| Team Collaboration | Work together on emails. |
| Task Management | Manage schedules and deadlines. |
| Customer Support | Handle inquiries efficiently. |
Benefits Of Using Shared Mailboxes
Shared mailboxes offer numerous benefits to teams. They simplify email management and enhance efficiency. Here are some key benefits:
- Improved Efficiency: Teams can respond faster to emails.
- Enhanced Accountability: Everyone can see who handled what.
- Better Organization: Emails are sorted in one place.
- Cost-Effective: No need for multiple licenses.
With a shared mailbox, team members can work together smoothly. It encourages better communication and reduces workload. Below is a comparison of shared mailboxes and individual mailboxes:
| Feature | Shared Mailbox | Individual Mailbox |
|---|---|---|
| Access | Multiple users | One user only |
| Collaboration | Easy and effective | Limited |
| Cost | Free for users | Requires separate license |
Using a shared mailbox streamlines processes for teams. It creates a more organized and productive work environment.
Prerequisites For Adding A Shared Mailbox
Adding a shared mailbox in Outlook can enhance teamwork and improve communication. Before you start, ensure you meet the necessary prerequisites. Knowing what you need can help you avoid issues later. This section covers the access permissions required and the supported Outlook versions.
Access Permissions
To add a shared mailbox, you must have the right access permissions. Without these permissions, you cannot view or manage the mailbox. Here are some key points:
- Admin Approval: You need permission from your organization’s admin.
- Full Access: This allows you to read, create, and delete items.
- Send As Permission: This lets you send emails as the shared mailbox.
Here’s a simple table to summarize the permissions:
| Permission Type | Description |
|---|---|
| Full Access | Read, create, and delete items in the mailbox. |
| Send As | Send emails as if they come from the shared mailbox. |
| Send on Behalf | Send emails on behalf of the shared mailbox. |
Once you have the necessary permissions, you can proceed with adding the shared mailbox. Always verify with your admin if you are unsure about your access rights.
Supported Outlook Versions
Not all versions of Outlook support shared mailboxes. Make sure you are using a compatible version. Here’s a list of supported versions:
- Outlook 2016: Fully supports shared mailboxes.
- Outlook 2019: Offers enhanced features for shared mailboxes.
- Outlook for Microsoft 365: Always updated with the latest support.
Older versions may not work properly. Check your version by following these steps:
- Open Outlook.
- Click on “File” in the top left corner.
- Select “Office Account” or “Help” to see your version.
Using a supported version helps ensure smooth functionality. If you have an unsupported version, consider upgrading for better support.
Step-by-step Guide To Adding
Adding a shared mailbox in Outlook is simple and effective. A shared mailbox allows multiple users to send and receive emails from the same address. This guide provides clear steps for adding a shared mailbox. Follow along with our easy-to-understand instructions.
Using Outlook Desktop
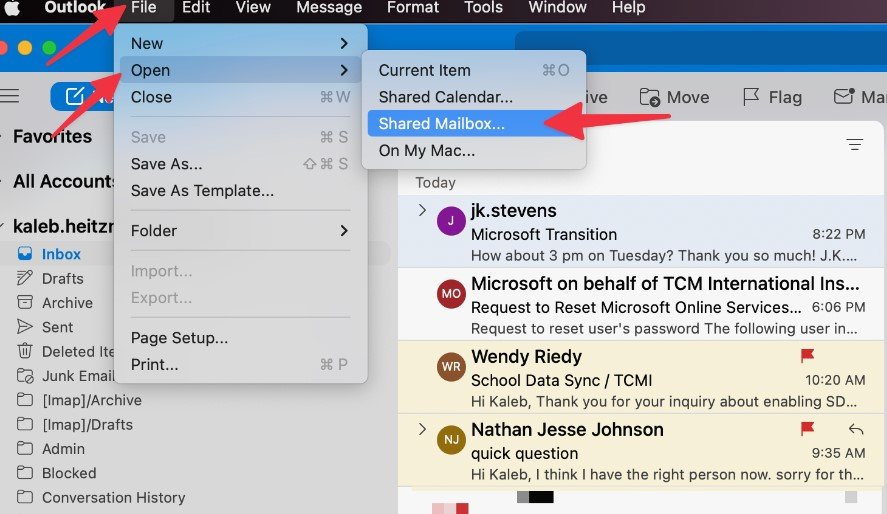
To add a shared mailbox in Outlook Desktop, follow these steps:
- Open Outlook on your computer.
- Click on the File tab in the top left corner.
- Select Account Settings, then click on Account Settings again.
- In the new window, select your email account and click Change.
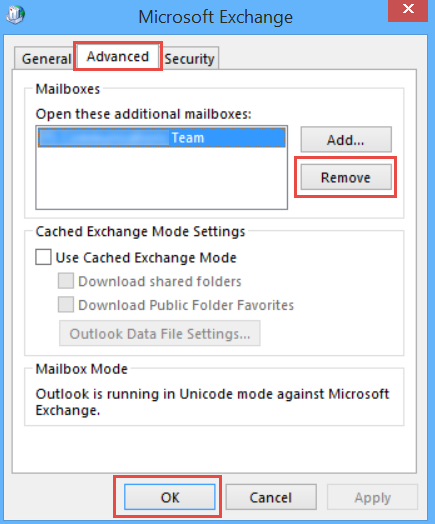
- Click on More Settings.
- Go to the Advanced tab.
- Click on Add under the “Open these additional mailboxes” section.
- Type the name or email address of the shared mailbox.
- Click OK and then Next.
- Finally, click Finish and then Close.
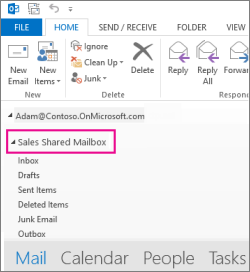
Your shared mailbox should now appear in the left pane of Outlook. You can access it just like your main mailbox.
Here’s a quick summary of what you need:
| Step | Action |
|---|---|
| 1 | Open Outlook |
| 2 | Go to File > Account Settings |
| 3 | Select your account |
| 4 | Add the shared mailbox |
Using Outlook Web
Adding a shared mailbox in Outlook Web is quick and easy. Here are the steps:
- Log in to your Outlook Web account.
- Click on your profile picture in the top right corner.
- Select Open another mailbox.
- Type the email address of the shared mailbox.
- Click Open to access it.
After completing these steps, the shared mailbox will open in a new tab. You can read and send emails from there.
Here are the key actions summarized:
| Step | Action |
|---|---|
| 1 | Log in to Outlook Web |
| 2 | Click on your profile picture |
| 3 | Type the shared mailbox email |
Now you can easily manage shared emails directly from your Outlook Web account.
Managing Shared Mailbox Access
Managing access to a shared mailbox in Outlook is vital for teamwork. A shared mailbox allows multiple users to send and receive emails from one central address. Proper management ensures everyone has the right access. This section will guide you on how to add and remove members effectively.
Adding Members
To add members to a shared mailbox, follow these simple steps. Adding the right people enhances collaboration.
- Open the Outlook app or website.
- Go to the Admin Center.
- Select Groups and then Shared mailboxes.
- Choose the mailbox you want to manage.
- Click on Edit under Members.
Next, add members by following these steps:
- Click on Add members.
- Search for the user’s name.
- Select the user and click Add.
- Repeat for any additional members.
After adding members, ensure they know how to access the mailbox. They can find it in their Outlook account. Here’s a quick reference table:
| Step | Action |
|---|---|
| 1 | Open Outlook and go to Admin Center. |
| 2 | Select Groups > Shared mailboxes. |
| 3 | Choose the mailbox and click Edit. |
| 4 | Click Add members and search for users. |
Removing Members
Sometimes, you may need to remove members from a shared mailbox. This helps maintain security and control over access.
- Open the Outlook app or website.
- Access the Admin Center.
- Go to Groups, then Shared mailboxes.
- Select the mailbox you wish to manage.
- Click on Edit under Members.
To remove a member, follow these steps:
- Find the member in the list.
- Click on the Remove button next to their name.
- Confirm the removal when prompted.
Keep in mind that removing a member will revoke their access to the shared mailbox. Here’s a quick reference table:
| Step | Action |
|---|---|
| 1 | Open Outlook and go to Admin Center. |
| 2 | Select Groups > Shared mailboxes. |
| 3 | Choose the mailbox and click Edit. |
| 4 | Find the member and click Remove. |
Common Issues And Fixes
Adding a shared mailbox in Outlook can be a simple task. Yet, users often face common issues that can make the process frustrating. Understanding these problems and their fixes can save time and effort. This section will cover login problems and sync issues. Let’s dive into these challenges and how to resolve them.
Login Problems
Login problems are a frequent issue when accessing a shared mailbox. Users may encounter error messages or be unable to log in altogether. Here are some common reasons and their fixes:
- Incorrect Credentials: Ensure that you are using the correct email address and password.
- Permission Issues: Verify that you have been granted access to the shared mailbox. Contact your administrator if unsure.
- Account Settings: Check your Outlook account settings. Make sure they are configured correctly.
Here’s a simple table outlining these problems and their fixes:
| Problem | Possible Fix |
|---|---|
| Incorrect Credentials | Re-enter your email and password. |
| Permission Issues | Contact your IT admin for access. |
| Account Settings | Review and adjust your Outlook settings. |
By following these steps, most login problems can be resolved quickly. Always ensure that your information is up to date.
Sync Issues
Sync issues can prevent emails from showing up in the shared mailbox. This can lead to missed messages and delays. Here are some common causes and solutions:
- Internet Connection: A weak or unstable connection can disrupt syncing. Check your internet status.
- Outdated Outlook: Ensure that your Outlook application is up to date. An outdated version can cause syncing problems.
- Cache Issues: Clearing the cache can often resolve sync problems. Here’s how:
- Close Outlook.
- Navigate to the cache folder.
- Delete the contents of the folder.
- Reopen Outlook.
For quick reference, here is a table summarizing sync issues and their fixes:
| Sync Problem | Solution |
|---|---|
| Weak Internet Connection | Check and improve your connection. |
| Outdated Outlook | Update your Outlook application. |
| Cache Issues | Clear the Outlook cache. |
By addressing these sync issues, you can ensure smooth access to your shared mailbox. Regular maintenance helps keep everything in check.
Best Practices For Shared Mailboxes
Adding a shared mailbox in Outlook can improve team communication and collaboration. However, using shared mailboxes effectively requires following some best practices. These practices help everyone stay organized and ensure that important emails don’t get lost.
Organizing Emails
Keeping emails organized in a shared mailbox is crucial. An organized mailbox helps team members find information quickly. Here are some tips to help you stay organized:
- Create Folders: Set up specific folders for different projects or topics.
- Use Labels: Label emails for easy identification.
- Archive Old Emails: Regularly archive emails that are no longer needed.
Consider using a table to track email organization:
| Folder Name | Description | Last Updated |
|---|---|---|
| Project A | Emails related to Project A. | 10/01/2023 |
| Client Queries | Emails from clients with questions. | 09/30/2023 |
| Team Updates | Emails about team meetings and updates. | 10/02/2023 |
Regularly review and update your folder structure. This keeps your shared mailbox tidy and efficient. Encourage team members to follow the same organizing rules to ensure consistency.
Setting Up Rules
Setting up rules in Outlook can automate email management. Rules help sort incoming emails and ensure they reach the right people. Here are ways to set up effective rules:
- Sort by Sender: Direct emails from specific senders to designated folders.
- Flag Important Emails: Automatically flag emails that need urgent attention.
- Forward Emails: Forward emails to the right team member based on keywords.
Follow these steps to create a rule:
- Open Outlook and go to the Home tab.
- Click on “Rules” and select “Manage Rules & Alerts.”
- Choose “New Rule” and follow the prompts to set conditions.
- Select actions for the rule, like moving or flagging emails.
- Save the rule to activate it.
Regularly check and update rules as needed. This keeps the shared mailbox running smoothly. Involve your team in rule creation for better results.
Using Shared Mailbox On Mobile
Adding a shared mailbox in Outlook allows teams to collaborate easily. Using a shared mailbox on mobile devices makes communication seamless. This feature helps you manage emails from anywhere. You can stay connected with your team, no matter where you are.
Outlook App Setup
Setting up a shared mailbox in the Outlook app is simple. Follow these steps:
- Open the Outlook app on your mobile device.
- Tap the profile icon in the top left corner.
- Select “Settings” at the bottom of the menu.
- Under “Mail Accounts,” tap “Add Account.”
- Choose “Add Shared Mailbox.”
- Enter the shared mailbox email address.
- Tap “Continue” and follow prompts.
Once set up, you will see the shared mailbox in your inbox. You can switch between your personal and shared mailbox easily.
Here are some important tips:
- Ensure you have permission to access the shared mailbox.
- Keep the Outlook app updated for the best experience.
- Log in to the app with your work account.
Here is a quick table summarizing the setup steps:
| Step | Action |
|---|---|
| 1 | Enter your email address. |
| 2 | Open the Outlook app. |
| 3 | Select “Settings.” |
| 4 | Choose “Add Shared Mailbox.” |
| 5 | Enter email address. |
| 6 | Follow prompts to finish. |
Accessing Other Apps
You can access a shared mailbox on other apps too. Some apps like Apple Mail or Gmail allow this feature. Here’s how to do it:
- Open the email app you want to use.
- Add the shared mailbox as a new account.
- Enter the shared mailbox email and password.
- Follow the setup instructions provided by the app.
Here are some common apps and their setup tips:
- Apple Mail: Use the same steps as adding a regular account.
- Gmail: Go to settings and add another account.
- Outlook Web: Use the same login as the Outlook app.
Remember:
- Check your permissions for accessing the mailbox.
- Some apps may require extra steps.
- Always keep your apps updated.
With these tips, accessing a shared mailbox on mobile and other apps becomes easy. Stay connected with your team no matter where you are!
Security Considerations
Adding a shared mailbox in Outlook is a great way to collaborate with your team. However, security considerations are important to protect sensitive information. A shared mailbox can be accessed by multiple users, so understanding how to safeguard data is crucial. This guide will cover key aspects of data protection and managing permissions for shared mailboxes.
Data Protection
Data protection is essential when using a shared mailbox. Since multiple users access it, risks increase. Follow these guidelines to keep information safe:
- Use strong passwords: Ensure that the shared mailbox has a complex password.
- Enable two-factor authentication: This adds an extra layer of security.
- Regularly update passwords: Change passwords every few months.
- Limit access to sensitive data: Only share important information with necessary team members.
Consider using encryption for emails that contain sensitive information. Encryption ensures that only the intended recipient can read the message.
| Data Protection Method | Description |
|---|---|
| Strong Passwords | Use at least 12 characters, including numbers and symbols. |
| Two-Factor Authentication | Requires a code sent to a phone or email. |
| Email Encryption | Scrambles email content, keeping it private. |
Managing Permissions
Managing permissions is vital for a shared mailbox. It determines who can access the mailbox and what they can do. Set clear permissions to protect your data:
- Assign roles: Define roles like Owner, Editor, or Viewer.
- Regularly review permissions: Check who has access every few months.
- Remove access for former employees: Ensure ex-employees cannot access the mailbox.
To manage permissions effectively, use the following steps:
- Open Outlook and go to the shared mailbox.
- Right-click on the mailbox and select Permissions.
- Adjust permissions for each user as needed.
By managing permissions wisely, you can prevent unauthorized access and maintain data integrity in your shared mailbox.

Conclusion
Adding a shared mailbox in Outlook enhances collaboration and streamlines communication. Following the steps outlined in this guide makes the process simple and efficient. With a shared mailbox, your team can work more effectively and stay organized. Embrace this feature to improve your email management and foster better teamwork.